• Skip to primary navigation
  • Skip to main content
  • Skip to primary sidebar
  • About Me
  • Blogging Resources
  • Disclosures & Sponsors
  • Privacy Policy
  • Contact Me

Chicken Scratch NY

  • Punch Needle
    • Chicken Scratch NY Pattern Shop
  • Farm
  • Garden
    • DIY Garden Projects
  • Food
    • Preserving Food
    • Desserts
  • DIY
    • Fabric & Sewing
    • Paint
    • Paper
    • Vinyl
    • Wreaths
    • Wood
    • Yarn
  • Holiday
    • Birthday Parties
    • Valentine’s Day
    • St. Patrick’s Day
    • Spring & Easter
    • 4th of July
    • Halloween
    • Autumn & Thanksgiving
    • Christmas
  • Family Life
    • Crafting with Kids
    • Word Search & Crossword Puzzles & Mazes
  • Newsletter
You are here: Home / DIY / DIY Wooden Crate Centerpiece

DIY Wooden Crate Centerpiece

Last Updated November 14, 2019 By Alecia

handmade wooden crate with mustard yellow chalk paint and golden brown wax finish decorated for fall

A few years ago I developed an unheard of obsession with painting things mustard yellow. When I saw that DecoArt had released a line of chalky finish paint and it came in a mustardy yellow color I was perhaps a bit too happy.

Luckily they were nice enough to send me a jar of it along with a few other goodies to whip up this DIY Wooden Crate ready to take center stage on your Thanksgiving table.

Supplies:

  • 1×6 wood board
  • 1×2 wood board (6 ft length will get you all you need)
  • Saw
  • Wood glue
  • DecoArt Americana Gel Stain in Walnut
  • Brad Nailer & Compressor or Hammer & nails
  • DecoArt Americana Chalky Finish Paint in Inheritance
  • DecoArt Americana Decor Creme Wax in Golden Brown
  • Paint brushes

Wooden Crate Instructions:

Experiment with layering wood stain, paint and wax with this DIY Wooden Crate. The final product is perfect for the Thanksgiving Table

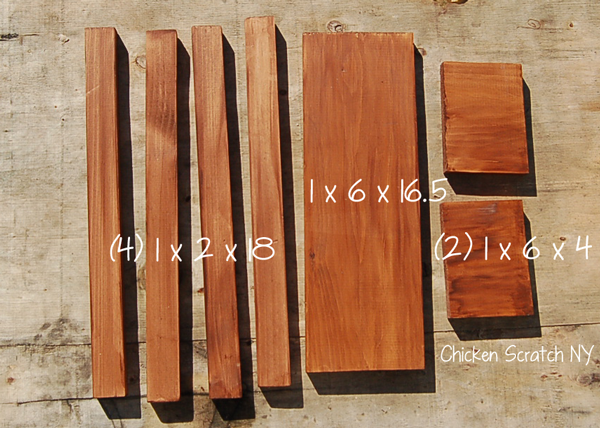
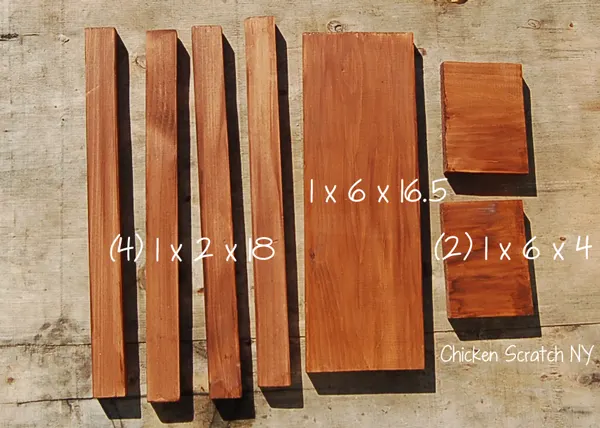
1. Measure and cut your boards:

  • (1) 16.25 in long 1 x6
  • (2) 4 inch long 1×6
  • (4) 18 inch long 1×2
    Experiment with layering wood stain, paint and wax with this DIY Wooden Crate. The final product is perfect for the Thanksgiving Table

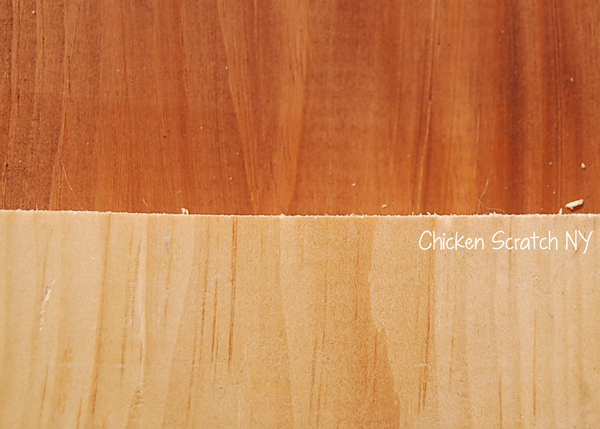
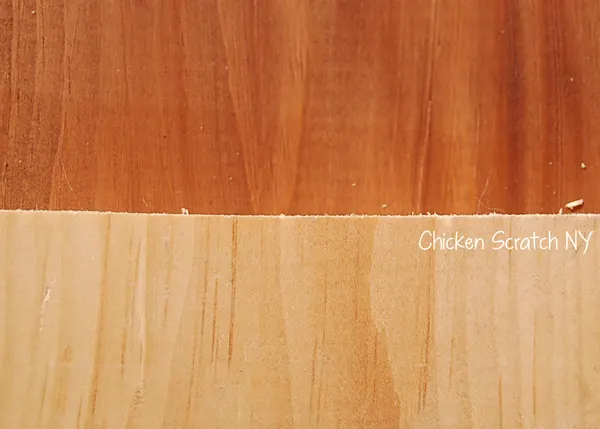
2. Stain all sides of the boards with the gel stain. This was my first time using a gel stain, it has the consistency of paint. I’m still on the fence about it.

I’m used to using a really thin oil based stain that I can slap on quickly. This took longer to put on but the first piece was dry by the time I got to the last and NO SMELL! I think I’ll stick to my regular stain for large projects but keep this on hand for smaller stuff.

I was expecting the walnut to be darker but it might have been more of an issue with my application method

Experiment with layering wood stain, paint and wax with this DIY Wooden Crate. The final product is perfect for the Thanksgiving Table

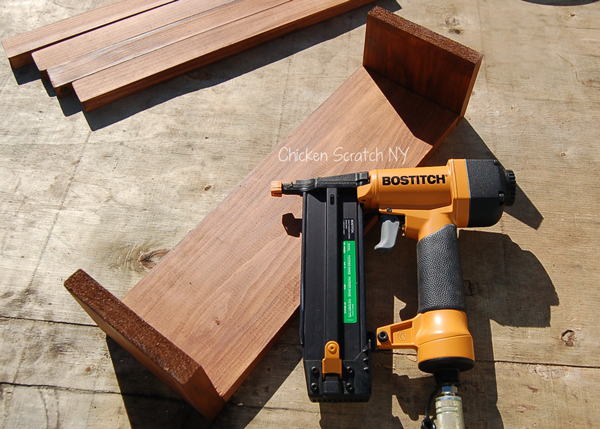
3. After the stain is dry glue and nail the 4 inch pieces to the short ends of the 16.25 inch 1×6.

If you’re on the fence about getting a compressor and some fancy nail guns GO FOR IT! I had one project in mind when we bought the set and I was afraid I wouldn’t use them enough to make it worth the price but they’ve been worth every penny.

Literally minutes to staple all the fencing for my 10*30 ft chicken run, plus refilling tires, fencing the garden and lots of odd job building projects.

Experiment with layering wood stain, paint and wax with this DIY Wooden Crate. The final product is perfect for the Thanksgiving Table

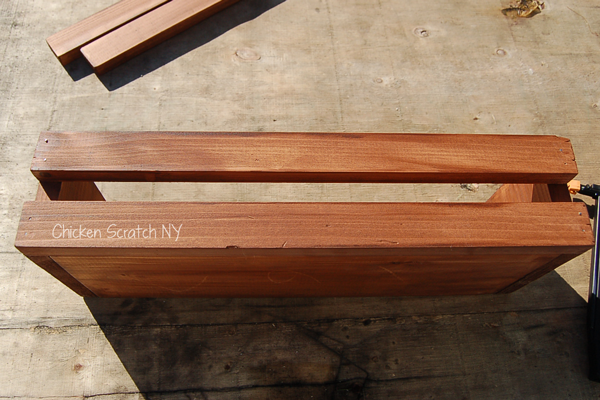
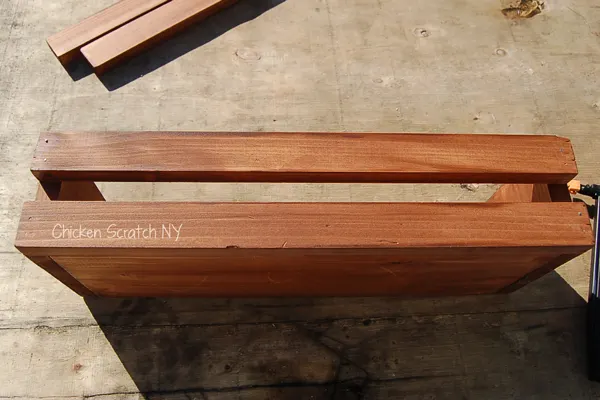
4. Nail and glue the 1×2’s to the frame starting at the bottom keeping everything flush, then add the top boards. You should have about a one inch space

Experiment with layering wood stain, paint and wax with this DIY Wooden Crate. The final product is perfect for the Thanksgiving Table

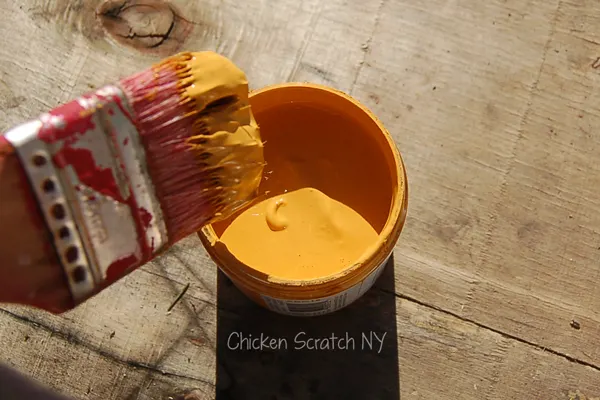
5. Paint the tray with the chalk finish paint. You may be wondering why we didn’t paint it first?

I was going for a more rustic look and I didn’t want a smooth even finish. I like to use super cheap chip brushed for paint jobs like this because they give you a rustic uneven texture.

I left the inside stain only. Imagine you were going to paint the top and sides with a roller, the areas it would touch are what you want to paint. This was my first time using non-homemade chalk paint.

I had a bit of a heart attack at first, this color (Inheritance) goes on really bright yellow but calms down as it dries.

As I was working on this I also repainted the frame for our giant chalk board and I’m going to play around with distressing that a bit. I really like the thickness of the paint.

When you go homemade there is a ‘sweet spot’ where the paint isn’t too thick or thin but just perfect, this paint hit that consistency right on the head.

Experiment with layering wood stain, paint and wax with this DIY Wooden Crate. The final product is perfect for the Thanksgiving Table

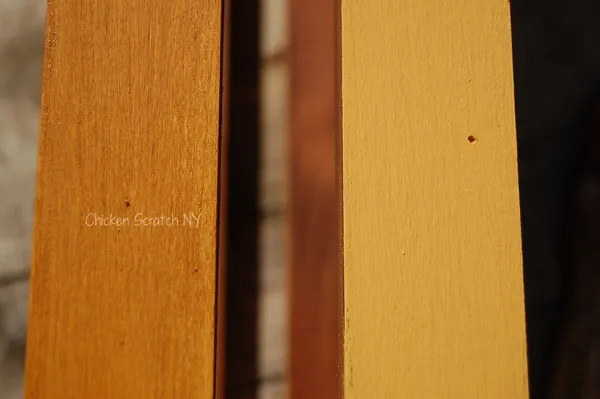
6. When the paint is dry get out another chip brush and dry brush on some golden brown wax, I left the stain-only areas alone and just waxed over the paint. It’s amazing how much dimension the wax adds.

It will harden overtime and protect the wood and paint. I love the color depth you get with this wax. I picked the golden brown but there is also a clear wax and a dark brown.

I can see the darker colors working really well as an accent or with darker colors but I think the golden brown is perfect for the mustardy color I used. I barely touched the wax, I can see this little tub lasting for a very long time so I think it’s a great investment if you do a lot of wood painting.

Experiment with layering wood stain, paint and wax with this DIY Wooden Crate. The final product is perfect for the Thanksgiving Table

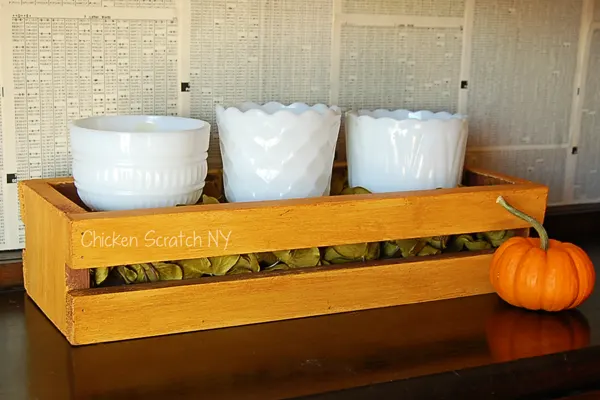
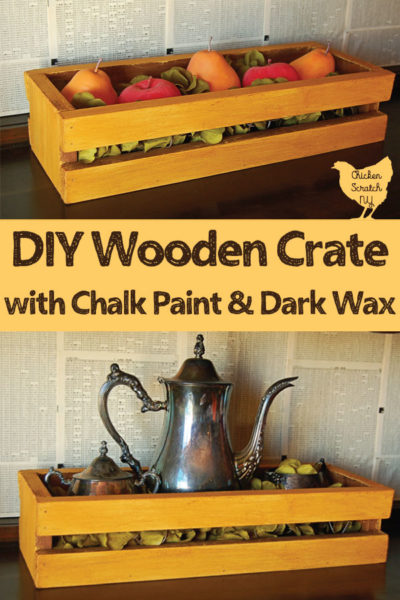
I had too much fun looking around my house for different things to fill up the crate with. My original plan was to use the hydrangeas I dried but my husband threw them out because them were dead. Instead I used some fake green hydrangeas, I pulled them apart and surrounded the three milk glass vases with the smaller bunches.

mustard yellow crate with wax finish holding metal teapot and sugar bowls in front of newspaper print walls

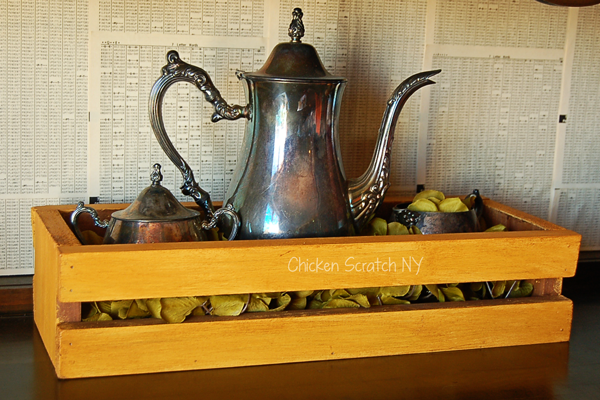
I kept the hydrangeas but swapped out the milk glass for a teapot, sugar bowl and creamer set I picked up at a garage sale this summer.

Experiment with layering wood stain, paint and wax with this DIY Wooden Crate. The final product is perfect for the Thanksgiving Table

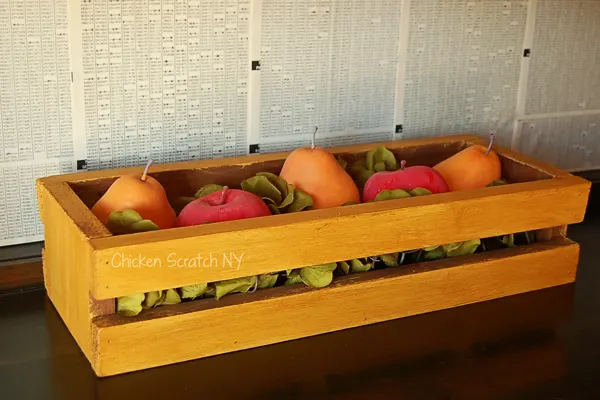
One more with the hydrangeas, this time I filled crate up with the chalk painted fruit I fancied up last fall. I find something unsettling about super shiny fruit.

Experiment with layering wood stain, paint and wax with this DIY Wooden Crate. The final product is perfect for the Thanksgiving Table

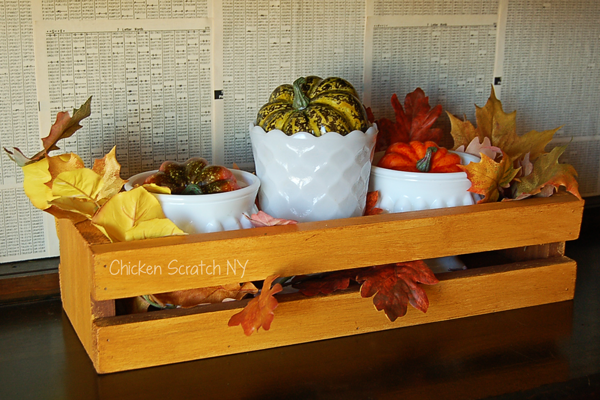
I call this autumn explosion. I pulled out the hydrangeas (the cat promptly knocked them on the floor and them Mary pulled them to pieces) put the milk glass back, tucked in a few stalks of fake leaves and dropped in a few fake gourds I had left over from the witchy wreath.

Don’t forget to PIN this to your DIY or Fall Crafts Board! Check out my Autumn page for more ideas or start here:

grapevine wreath on white front door with gold ferns, purple dogwood and a large white dahlia

Filed Under: Autumn & Thanksgiving, DIY Tagged With: DecoArt, paint, wood

Reader Interactions

Comments

  1. Amanda Love says

    November 3, 2014 at 10:49 am

    You did a great job!! I don’t think I’m that crafty and would need help from hubby when it comes to using tools. 🙂

    • Alecia says

      November 3, 2014 at 12:45 pm

      It’s really easy! Power tools can be intimidating but I know you can do it 🙂 work slowly and eliminate distractions. This is literally 6 cuts and a few pops with a nailer

  2. Alisha Kostiuk says

    November 3, 2014 at 11:01 am

    Your centerpiece looks awesome! I would love to make one that the kids could add their own touch to.

    • Alecia says

      November 3, 2014 at 12:44 pm

      Thank you! It would be cool to make one taller, book/magazine size, and let the kids decorate for their rooms

  3. Debbie Denny says

    November 3, 2014 at 11:01 am

    That is beautiful. I have an old tea set and this would be great way to display.

    • Alecia says

      November 3, 2014 at 12:47 pm

      Thank you! I was pleasantly surprised with how well the tea set fit

  4. Robin (Masshole Mommy) says

    November 3, 2014 at 11:33 am

    That is a really cute idea! I love it because you could change up what you put into it and customize it for whatever you need.

  5. Liz Mays says

    November 3, 2014 at 12:07 pm

    I pretty much love how you can switch up the look in an instant. The color is definitely going to be versatile!

    • Alecia says

      November 3, 2014 at 12:48 pm

      I’m all about reusing things all year round (even though I joke that it’s fall 12 months a year in my house). I’ve got a few plans for it this winter!

  6. Mama to 5 BLessings says

    November 3, 2014 at 1:26 pm

    This turned out great. What a nice idea to use to showcase items all year long.

  7. Taralyn says

    November 3, 2014 at 4:43 pm

    I love that teapot! It is gorgeous!

  8. maria @ close to home says

    November 3, 2014 at 6:52 pm

    what a cute centerpiece and love that you showed it used in many different ways. very creative.

  9. Shauna says

    November 3, 2014 at 9:46 pm

    That is just awesome… I love the idea of those. Would make great gifts, too…

  10. Kimberly Bergeron says

    November 3, 2014 at 10:36 pm

    I love it! Will try to make one or two this weekend!

  11. Lois Alter Mark says

    November 3, 2014 at 10:38 pm

    That is so pretty! I love that you can use it all year round and just change out the decorations inside.

  12. Elizabeth O says

    November 3, 2014 at 10:45 pm

    I would be having this amazing crate real soon!

  13. Cape Cod Mom Blog Amy says

    November 4, 2014 at 6:20 am

    What a gorgeous centerpiece or mantle piece this would make! You can even utilize it in multiple seasons!

  14. Rebekah says

    November 4, 2014 at 8:32 am

    Gorgeous – I’m really loving the third setup too. Great idea, and doesn’t seem too difficult.

  15. Kathleen says

    November 4, 2014 at 9:13 am

    That is so cute and looks easy to make. I would love to make one in white.

  16. Trisha says

    November 4, 2014 at 9:21 am

    What a neat project and I love that you are able to do so much with wooden crate. The possibilities are really endless!

  17. Debi says

    November 4, 2014 at 10:08 am

    That is a very pretty center piece idea. And very versatile.

  18. Beth says

    November 4, 2014 at 11:03 am

    What a great gift idea for Christmas! Thanks!!!

    Blessings,
    Beth

  19. Kristin says

    November 4, 2014 at 12:39 pm

    I just love this…There are so many things you could fill it with!

  20. Amy Desrosiers says

    November 4, 2014 at 1:33 pm

    What a great idea this is! I would love to make one for my odds and ends in my kitchen.

  21. Debbie L. says

    November 4, 2014 at 3:16 pm

    Very cute idea. I can imagine so many uses for the crate.

  22. Jessica Beal Harlow says

    November 4, 2014 at 3:41 pm

    This is such a versatile centerpiece! I like that you can change it up to reflect whatever season or holiday is approaching!

  23. Janeane Davis says

    November 4, 2014 at 4:38 pm

    You did such a great job. It is a piece you can use year round for many years to come.

  24. Christy H says

    November 4, 2014 at 6:48 pm

    This is so adorable. I have always been handy lady challenge but I am sure I can do this.

  25. Elizabeth Towns says

    November 5, 2014 at 2:29 pm

    What a neat craft challenge. This would be a great project to do with my son on a Saturday. He loves to deconstruct furniture and put it back together, so I’ve been finding smaller projects we can build together. This is perfect.

Primary Sidebar

Copyright © 2021 · Daily Dish Pro On Genesis Framework · WordPress · Log in