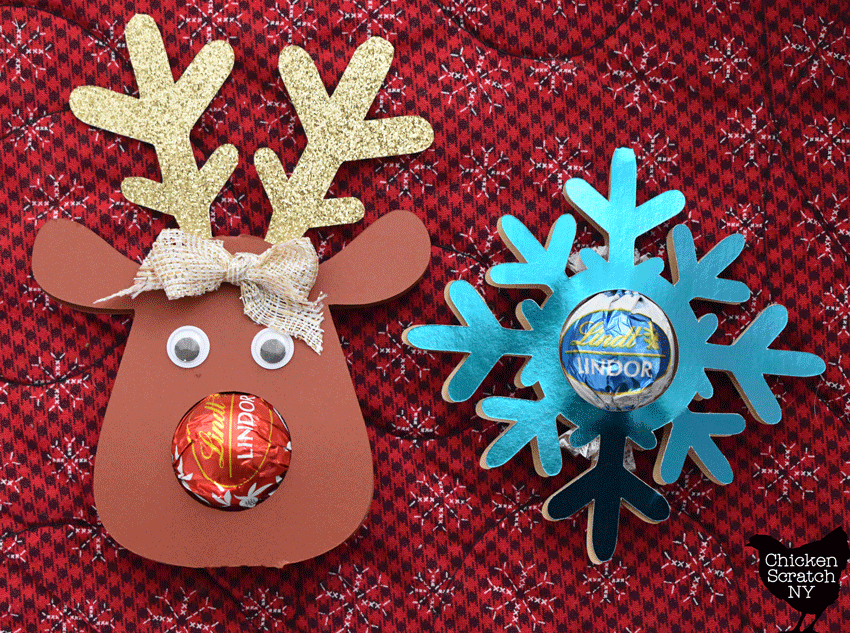
Add a fun and tasty twist to your holiday decorating this year with our cardstock snowflake and reindeer ornaments, complete with a sweet surprise – Lindt truffles!
These adorable and easy-to-make holiday ornaments double as small gifts for the holiday season and you can easily whip up enough for a whole class or group in no time!
You’ll need a Silhouette or similar machine to make these ornaments along with a cutting mat and a regular cutting blade.
If you’re using glitter or another kind of fancy cardstock you will need to adjust your cutting settings!
I highly recommend saving yourself some heartbreak and doing test cuts on all the different paper types before you waste a whole sheet.
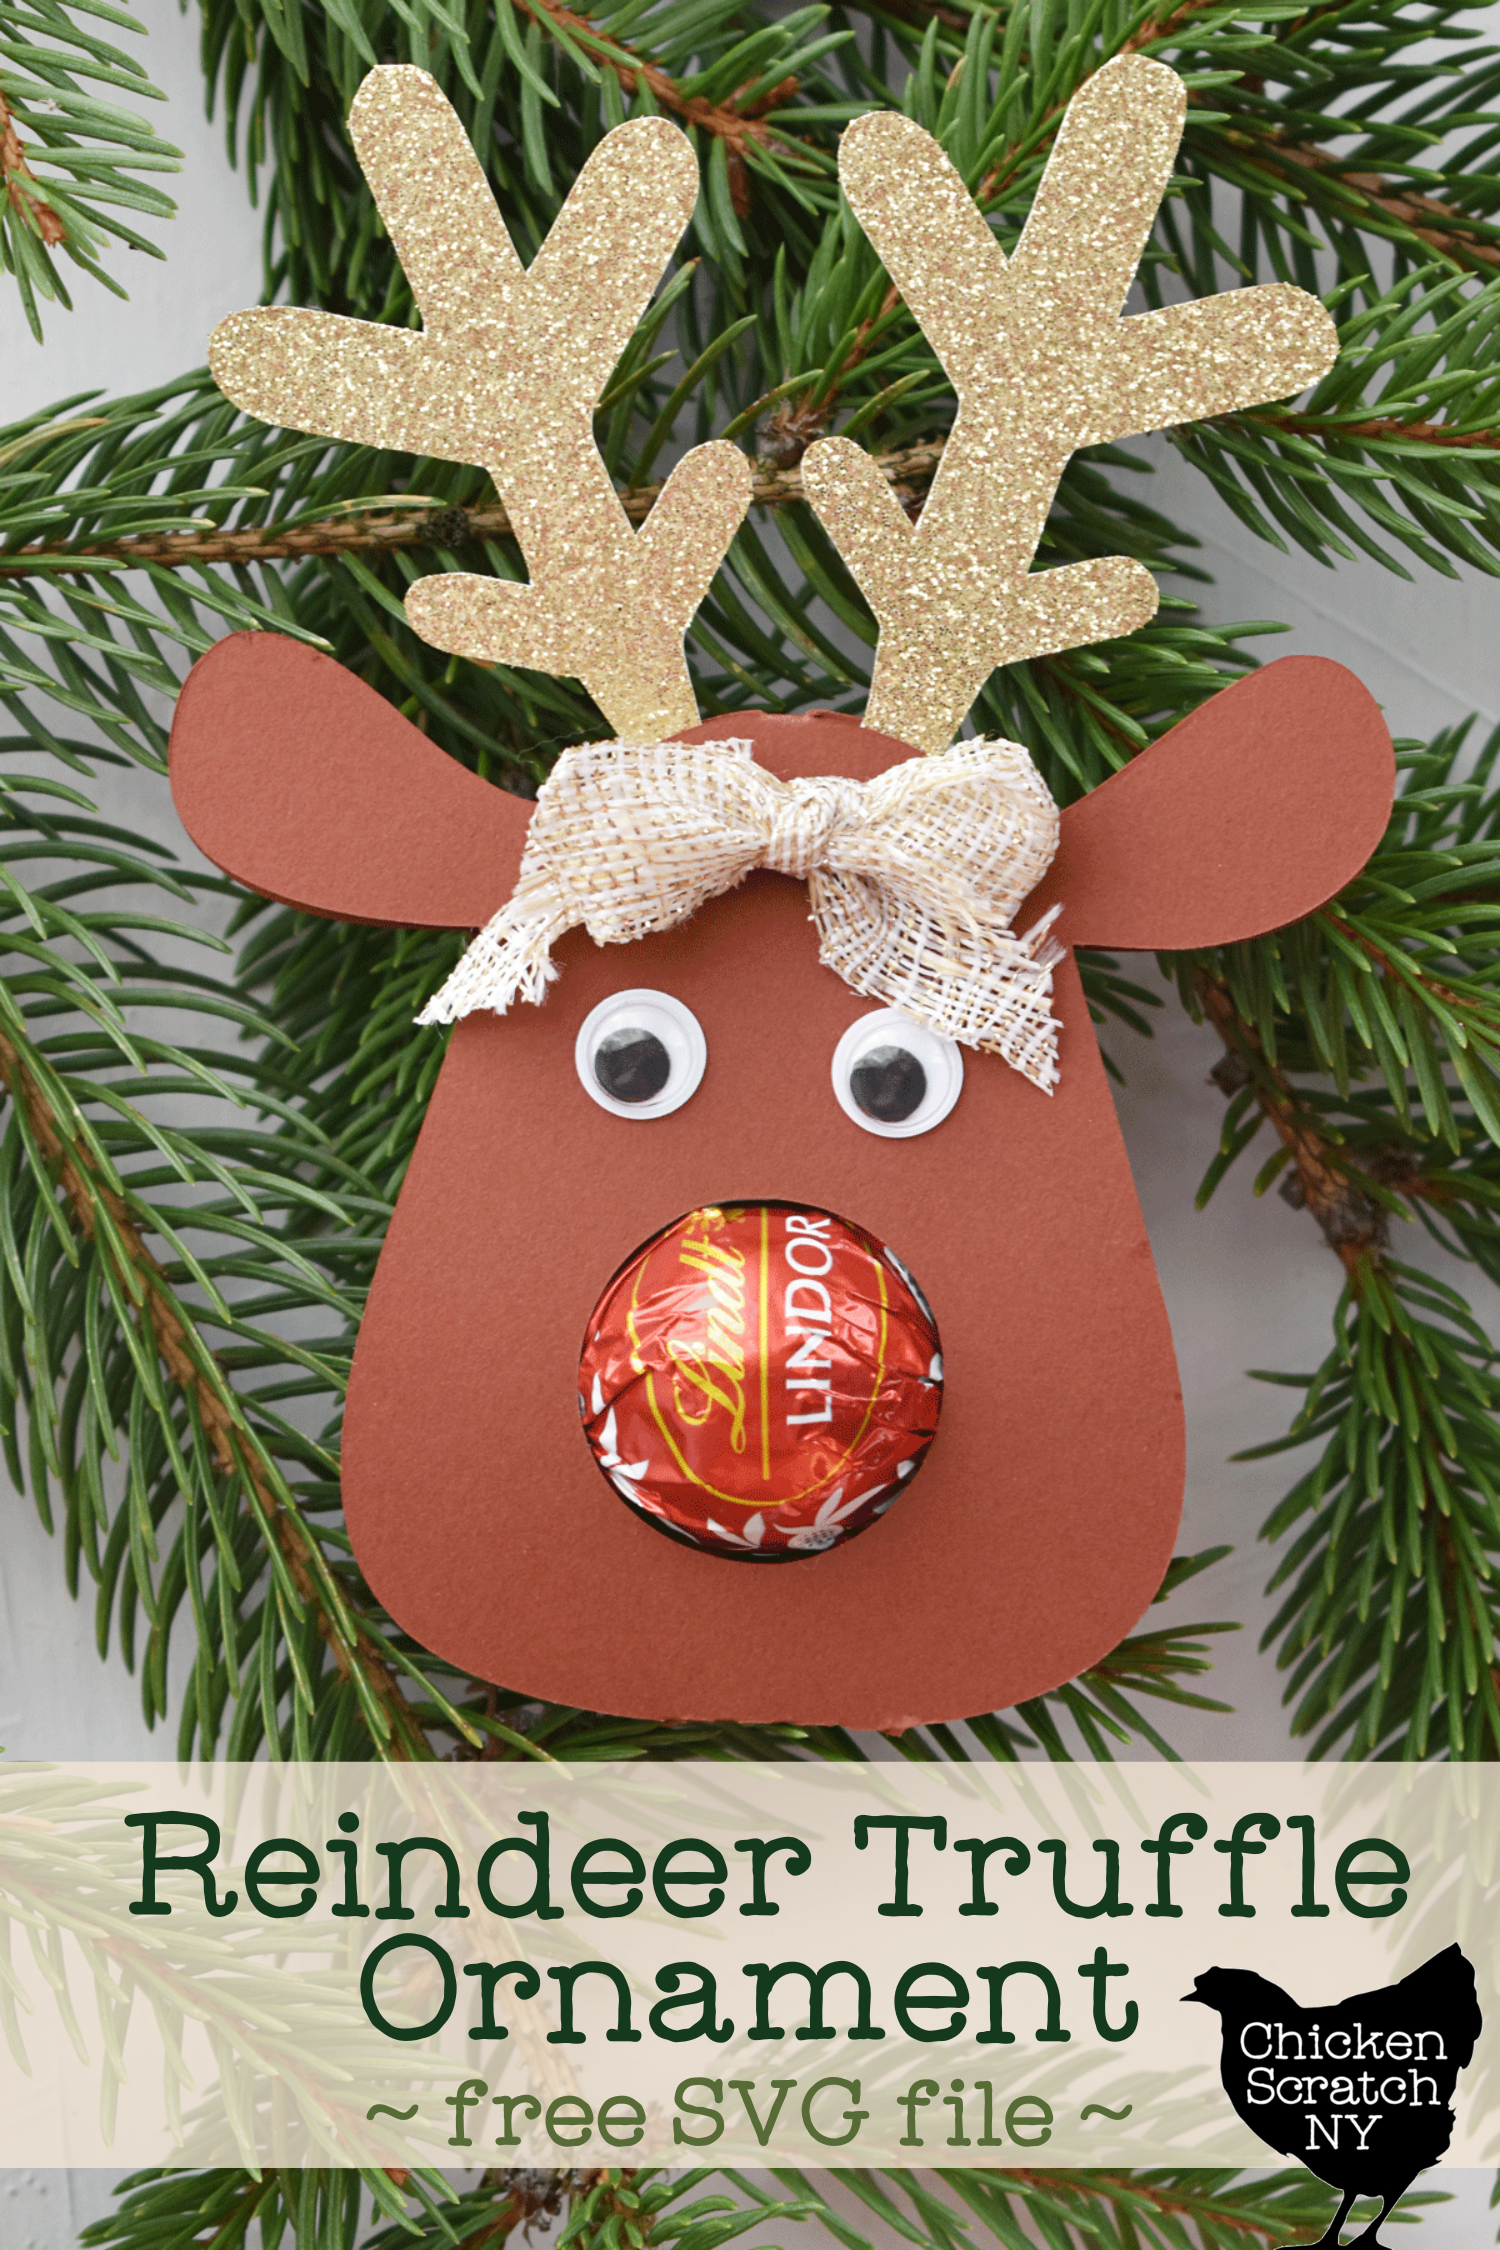
Reindeer Truffle Ornament:
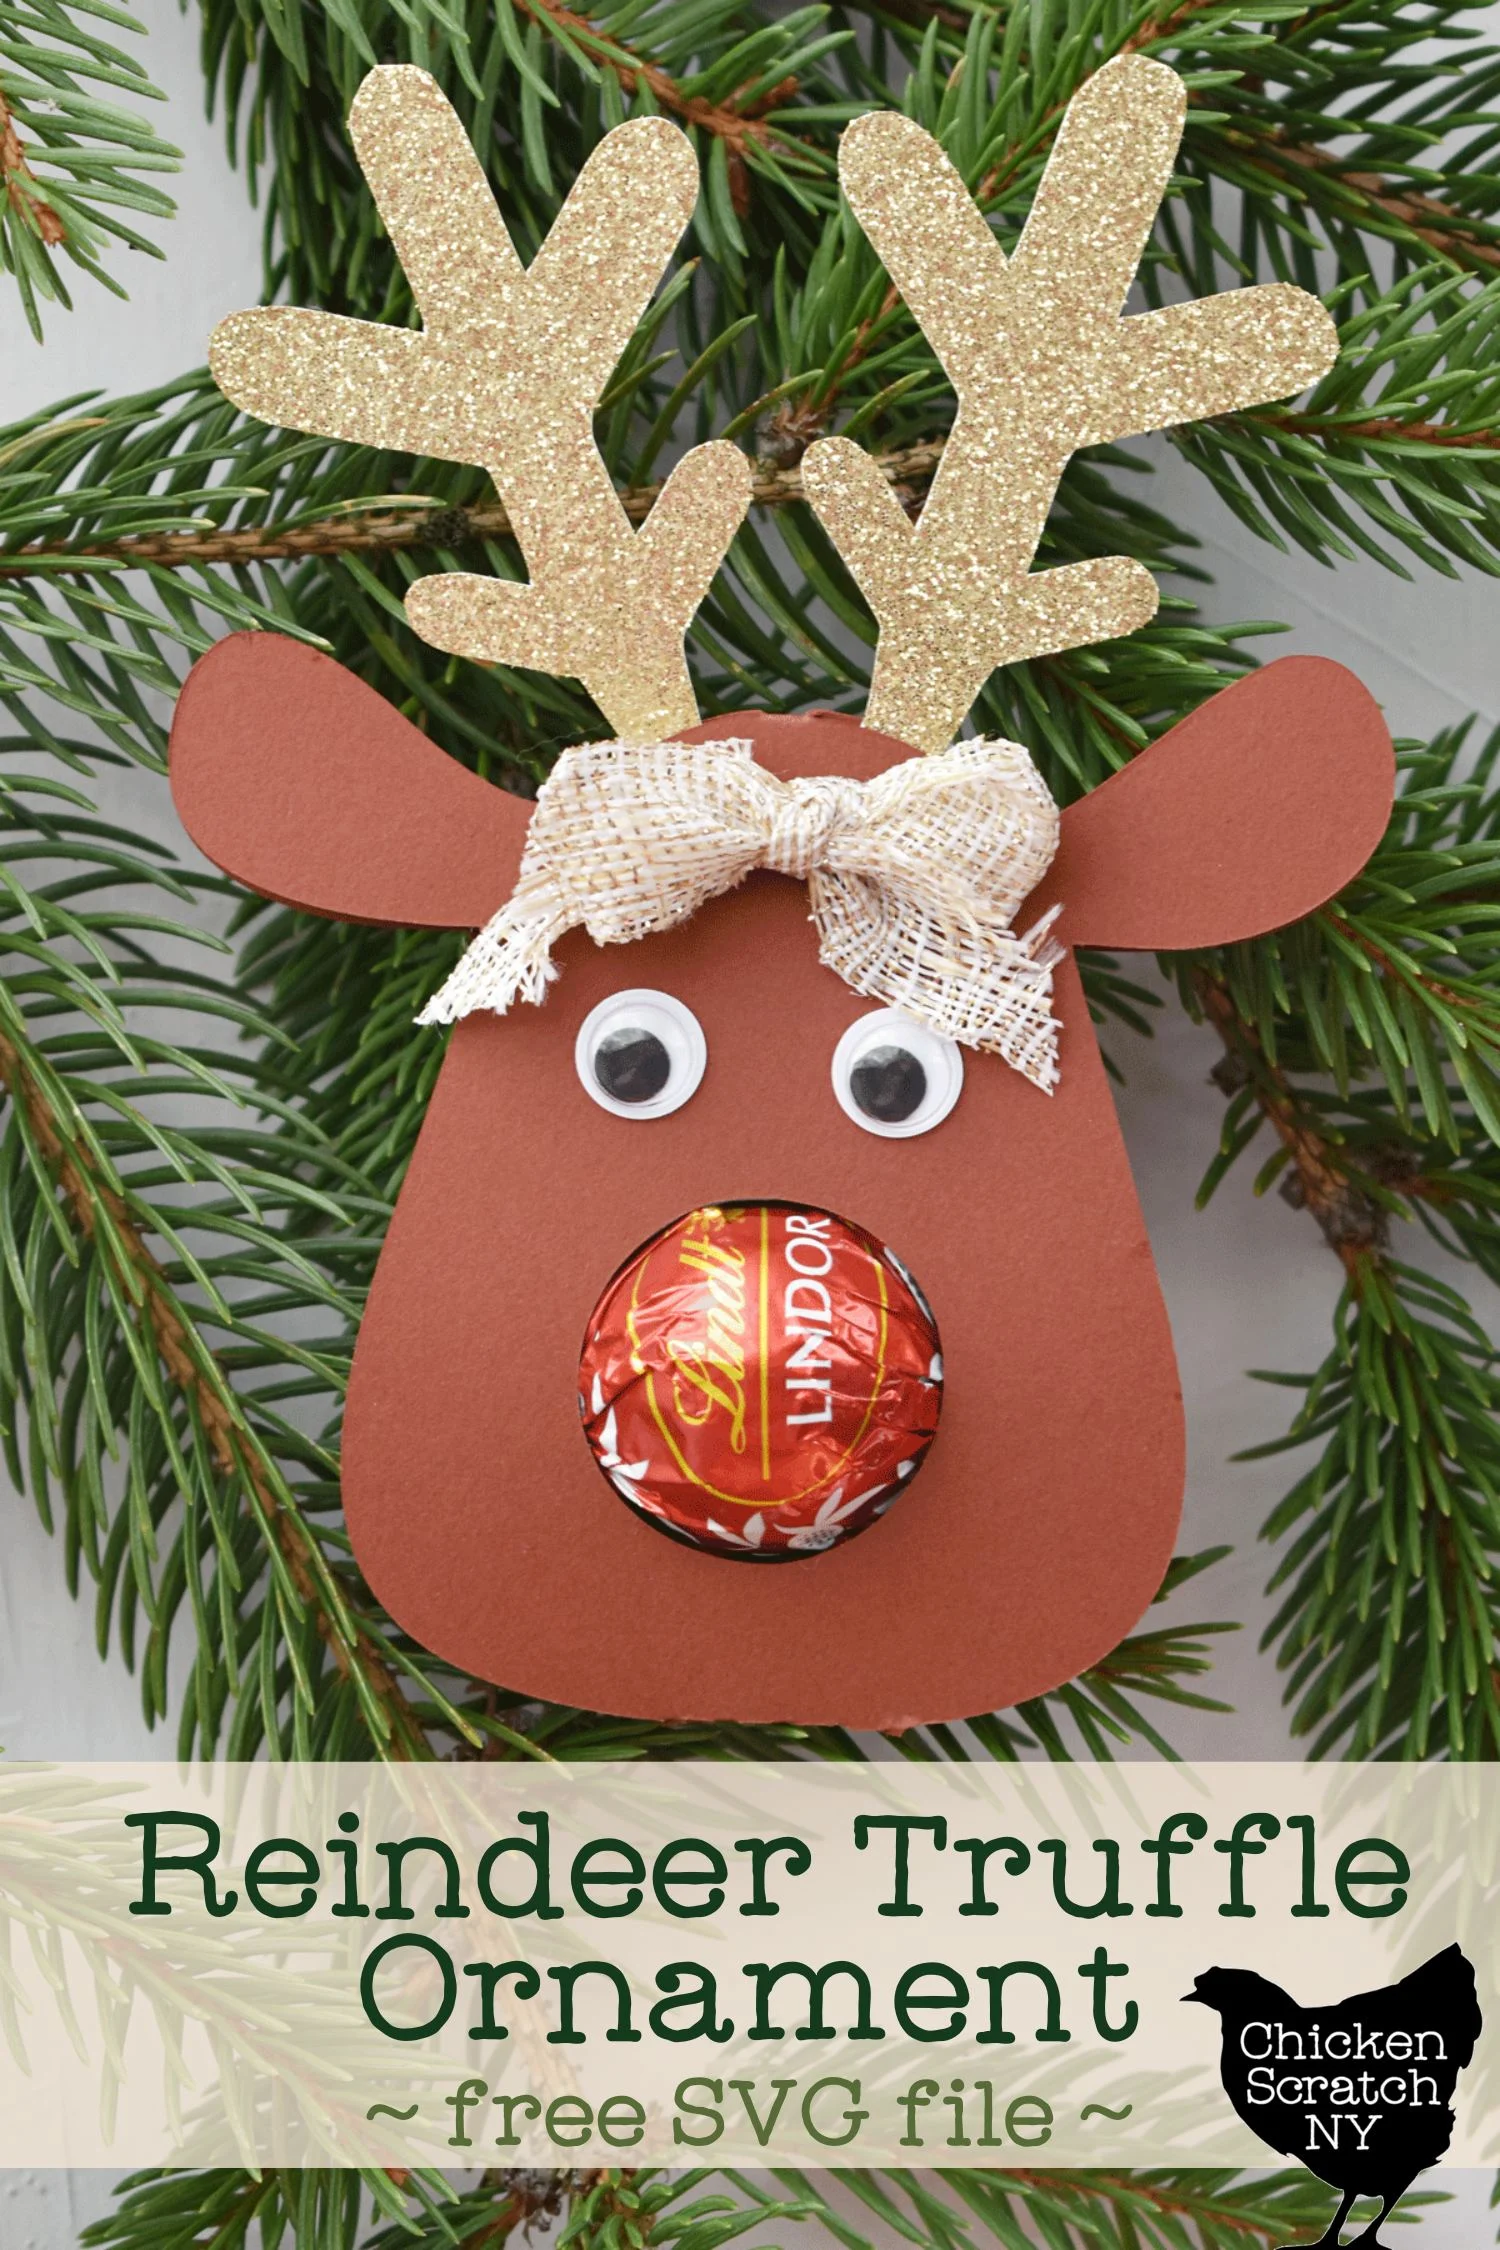
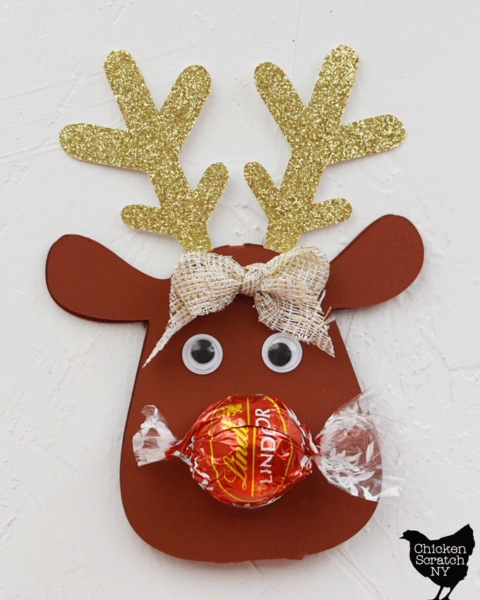
When it comes to adorable holiday mascots it’s hard to beat a cute little reindeer with a delicious nose made from a Lindt truffle!

When I was researching this post I found a few versions of this idea so even though it appeared in my brain one day while I was driving I can’t say it’s that original.
What I can say is I created my own version that doesn’t require a printer or glue. I think they’d make a really fun craft night activity for older kids or even adults.
Reindeer Ornament Supplies:
Along with your machine and its paraphernalia, you’ll need a few more supplies to make your ornaments:
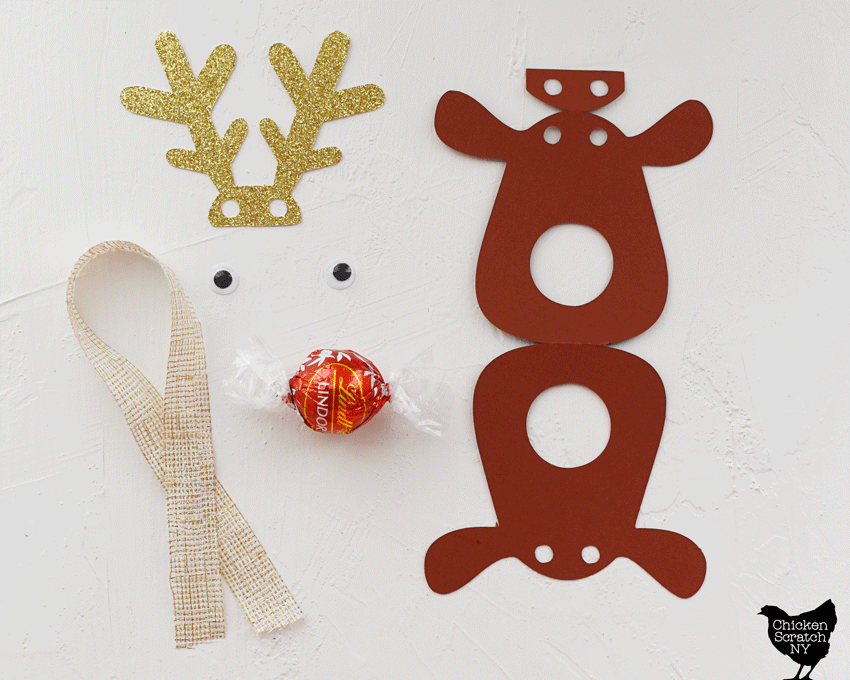
- Brown Cardstock (reindeer face)
- Gold Glitter Paper (antlers)
- Adhesive Googly Eyes
- Ribbon
- Lindt Truffles in Red, Brown, Gold or Black Wrappers
Get the Reindeer Truffle Ornament SVG
Before you cut anything you’ll need to separate the two pieces. In Silhouette Studio select the antler section, click, and drag it off of the cutting mat.
Select your paper size (most likely 12×12 or 8.5×11) then head over to the right sidebar and open the replicate panel.

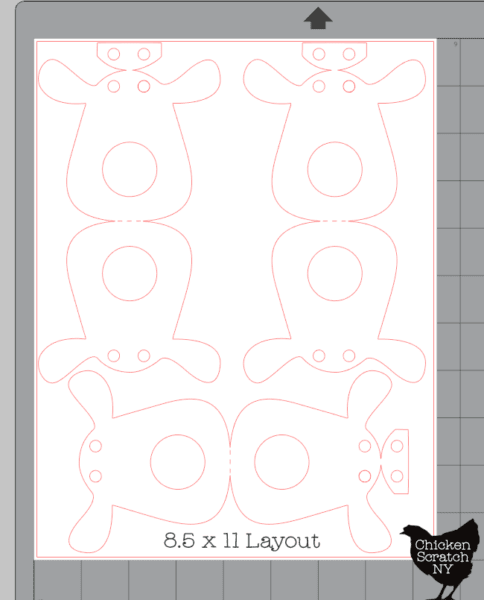
Duplicate and rotate your shapes to make the most of your paper, I was able to get 3 reindeer out of a sheet of letter-sized cardstock. You can only fit 4 on a 12″ x 12″ sheet and there is a lot more waste.
Unfortunately, you’ll have to do this by hand because the ‘fill page’ option will only give you 2 reindeer heads.
Repeat the process with the antler section, you can get a lot more of those per sheet! You can fit 6 on a letter-sized paper and 12 on a 12″ x 12″ sheet.
Remember to double-check your settings before you cut if you’re using two different types of paper!
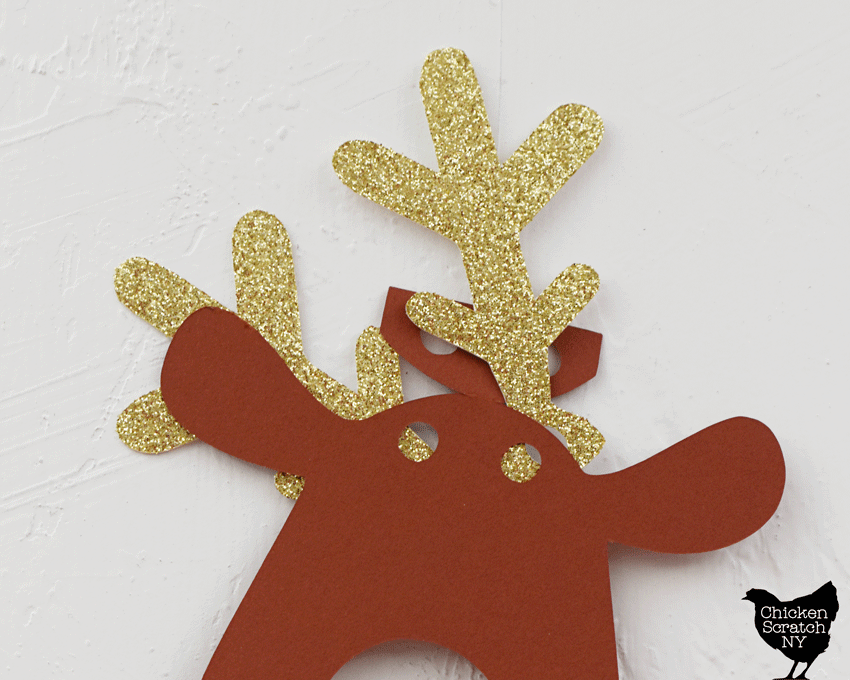

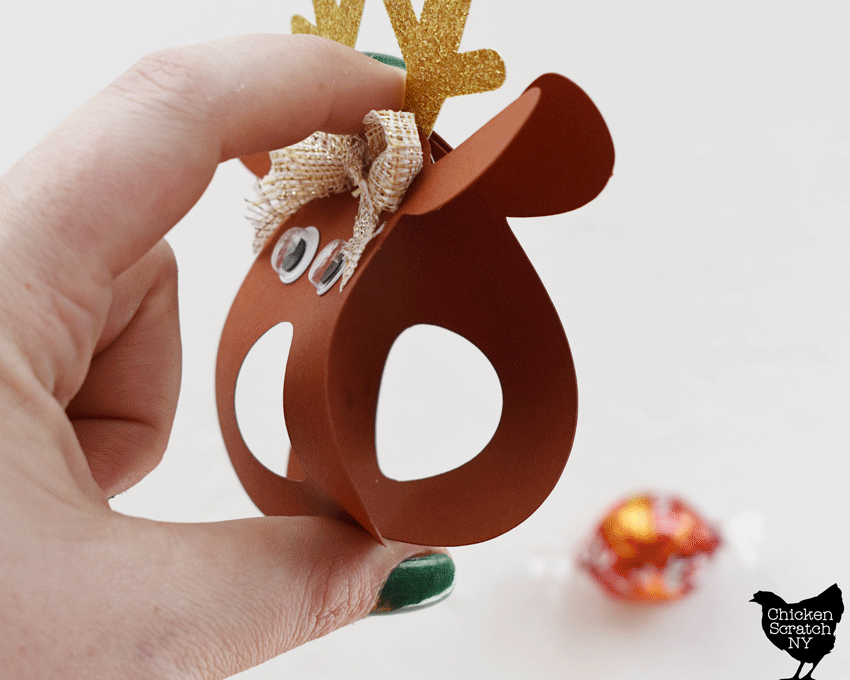
After cutting carefully fold the reindeer faces on the dotted lines. Slide the top section of the reindeer head through the antlers and then rotate to flatten it out.
Fold up the bottom piece, from the front to the back you should have:
- front face (brown)
- antlers (gold)
- back face (brown)
- top tab (brown)
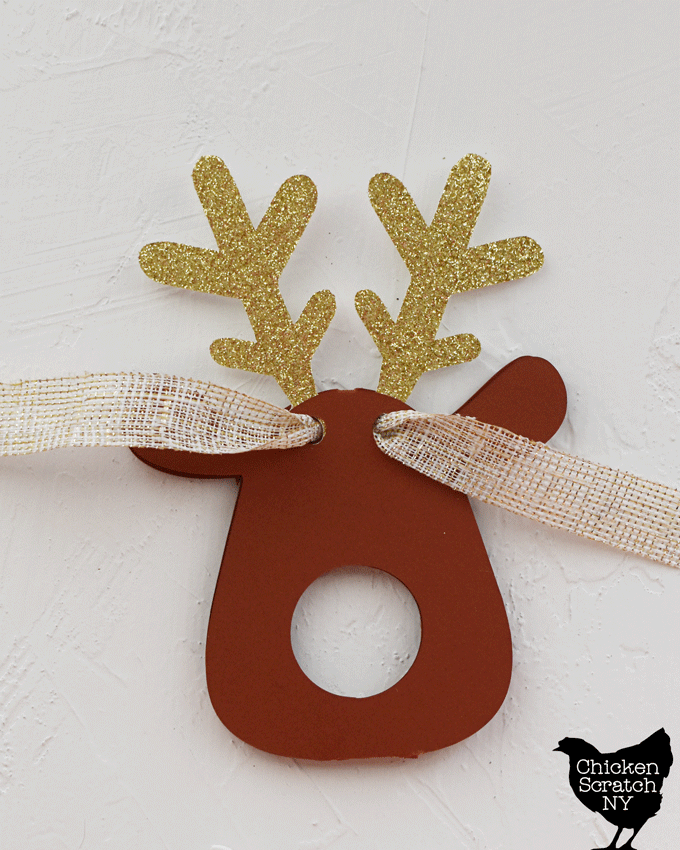
Line up all of the holes and slide a piece of ribbon through, leaving the tails on the front. Tie the ribbon into a bow to hold everything together.
I found it was easiest to leave the ribbon on the long side and trim off the excess instead of trying to make loops with the tips of your fingers.

Add two googly eyes and you’re just about done! If you want to write any messages on the back now is the time when they’re still flat.
This is also a great time to give the edges of the truffle wrapper a little trim so they don’t stick out on the sides.
They’re also a lot easier to store before you add the candy, which is great if you’re working ahead of time and you need to keep everything organized.
The final step is to squeeze down on the top and bottom of the reindeer to open it up so you can pop in a Lindt truffle.
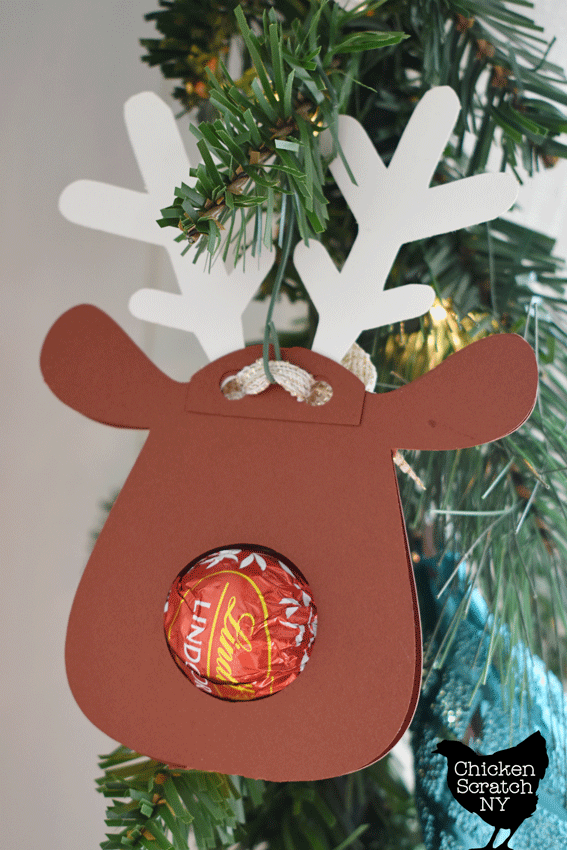

I hung mine up on the tree by hooking an ornament hook through the ribbon on the back.
Once the candy is gone you can replace it with a piece of glittery red paper and hang it on your tree for years to come!
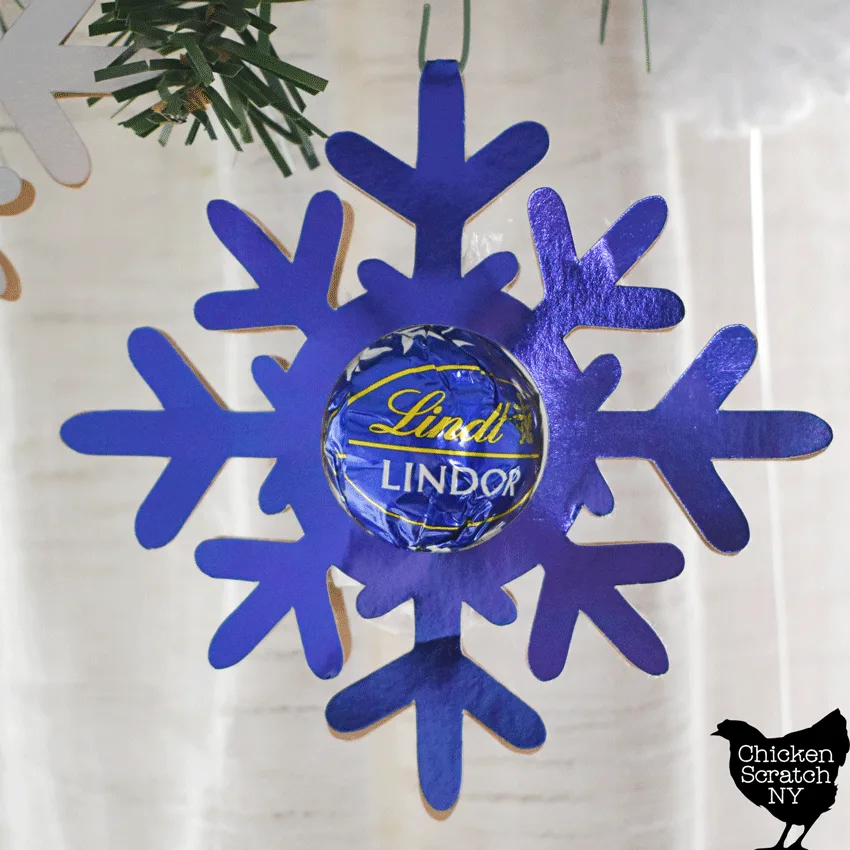
Snowflake Truffle Ornament:
If the reindeer is too cutesy and you’re looking for a more elegant look why not whip up a flurry of snowflakes?


The snowflake version of the Lind Truffle Ornament has a lot less to it so I think it’s the perfect time to pull out a fancy paper with a glittery, shiny foil, or fuzzy velvet finish.
Unlike the reindeer ornaments, the snowflake version doesn’t have much room for writing a message but they still make pretty ornaments to hang on the tree or add to a gift bag.
Snowflake Ornament Supplies:
- Fancy Silver or Blue Paper
- 1/4 Inch Foam Squares
- Lindt Truffles in Silver, Blue or Gold Wrappers
Get the Snowflake Truffle Ornament SVG
Open up the Snowflake Truffle Ornament in Silhouette Studio and start duplicating, unlike the reindeer this ornament is only one piece so you don’t have to separate anything.


Cut out all your snowflakes and pop them off the mat. Fold them in half, lining up the center hole and snowflake legs.
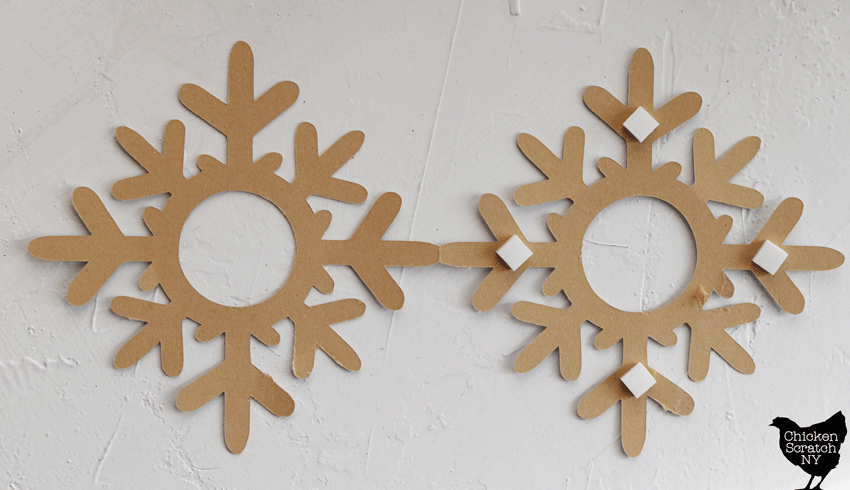
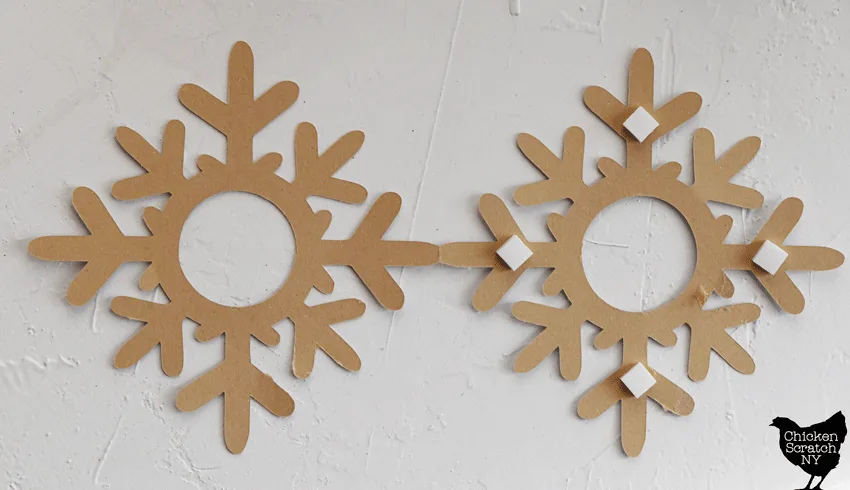
Trim up the sides of the truffle, place the wrapped chocolate in the center, and use 4 foam squares to close it up.
Add a ribbon or use a hook to hang up your snowflake ornaments!

Are you team reindeer or team snowflake? I’m a dark chocolate fan so even though I think the reindeer are much cuter, I’d rather receive a snowflake (or three!).
Check out my Christmas Page for more ideas or start here: