
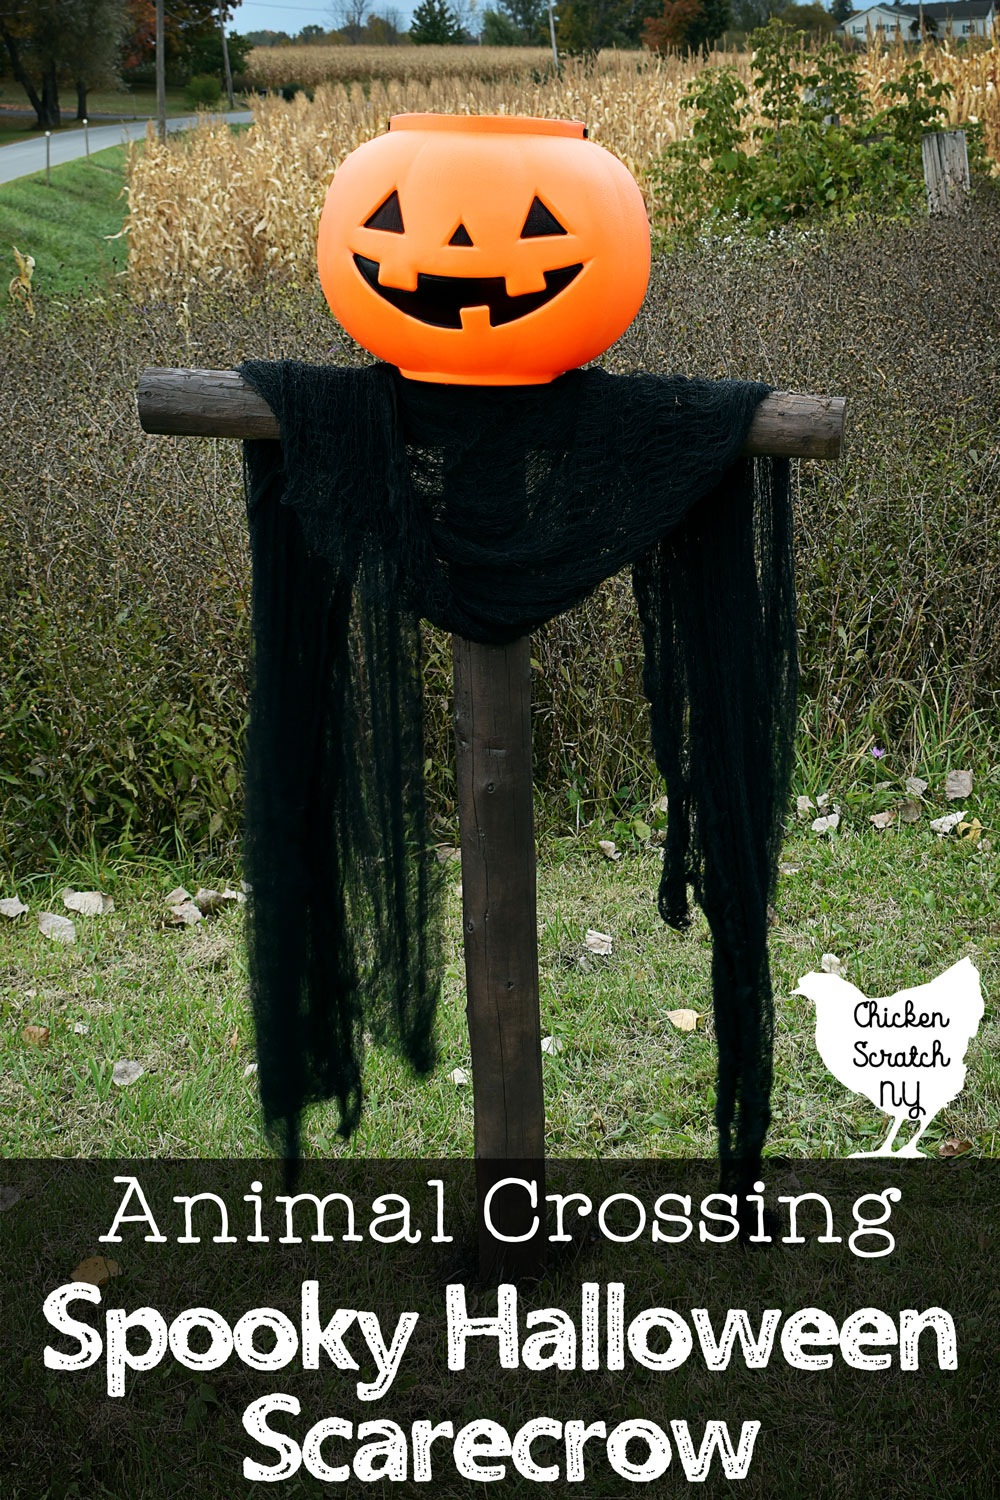
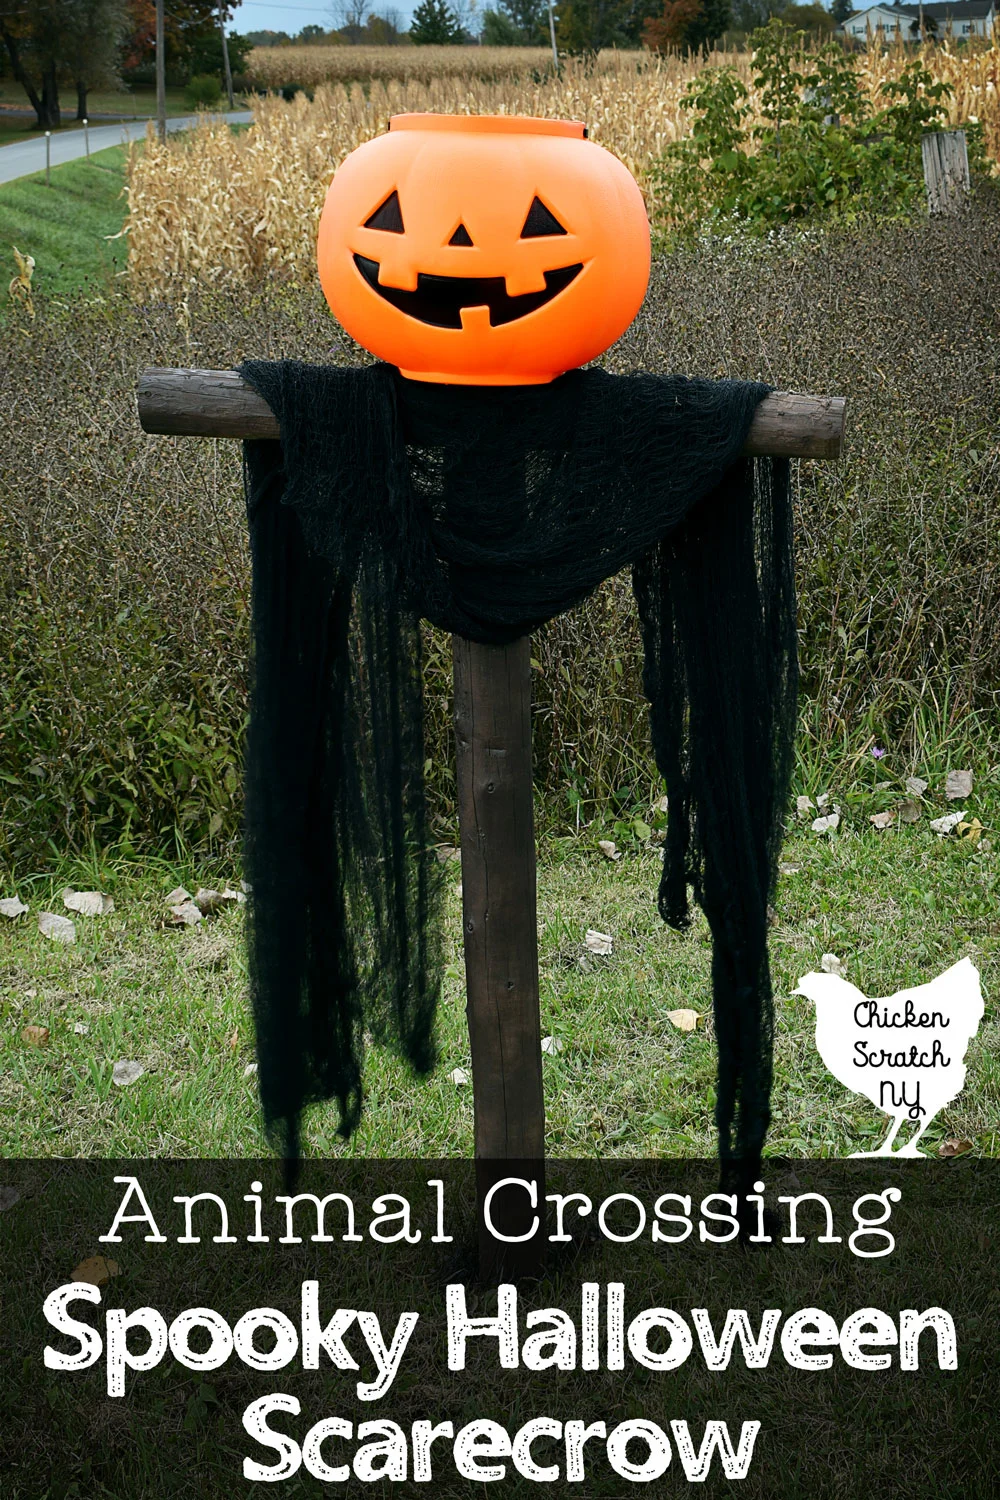
Get ready for Halloween with a quick DIY spooky scarecrow straight out of Animal Crossing!
Animal Crossing has been a welcome escape from the real world this year, and when they released the Halloween update my productivity reached an all time low.
My girls love playing the game and all of the new Halloween DIYs have had them in a pumpkin growing frenzy. I decided to surprise them with their very own Animal Crossing New Horizons inspired Spooky Scarecrow when they got off the bus.
The original plan for this project was much more elaborate, it included solar lights and a jigsaw. But an unrelated trip though Target led to me to a giant pumpkin bucket for $6 and the original plan was history.
Spooky Scarecrow Supplies
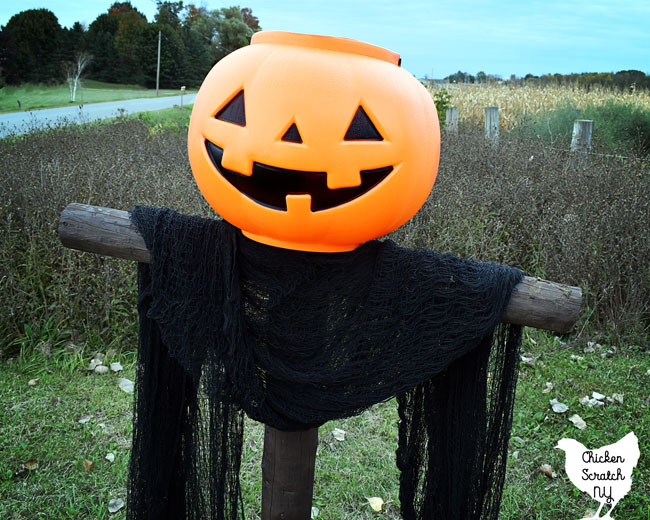
The main thing you’ll need is pumpkin head of your own. I grabbed mine at Target, I also picked up an extra long piece of that meshy Halloween fabric.
If the giant spooky scarecrow is too much for you you can make this on a smaller scale with a normal sized trick-or-treat pumpkin bucket and some sticks from the yard.
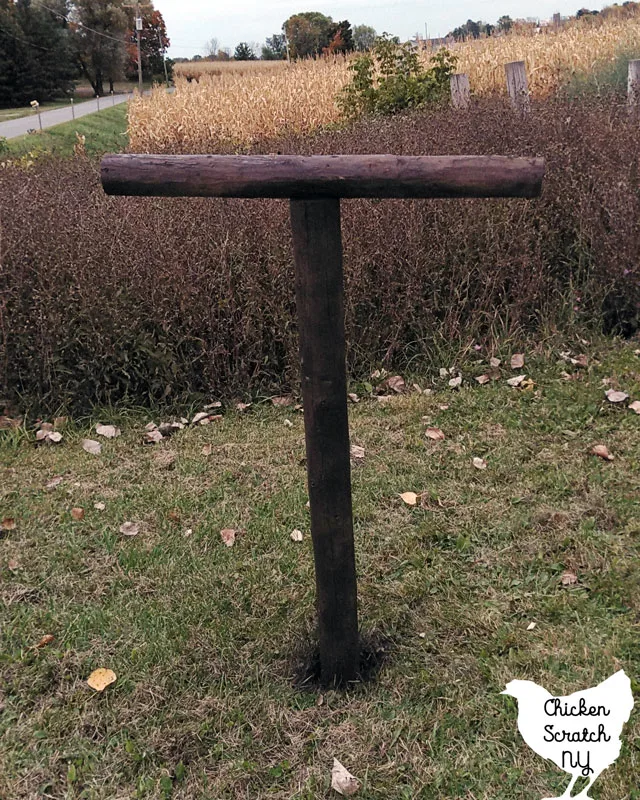
The scarecrow body is made from a few old round fence posts I had sitting around (farm hoarders unite, amirite?). I used my miter saw to cut one post down to the right height and cut another for the arm piece.
You will also need a metal t-post, a drill, a variety of screws and drill bits, washers or scrap wood and brown spray paint.
I wasn’t able to get my big drill in the bucket but the smaller Black & Decker fit with a little finagling.
How to Make a Halloween Scarecrow
This is a terrible tutorial. Let’s get that out of the way first.

But it’s a fun, pretty simple project that won’t take forever to finish.
The Body
The main support for the spooky scarecrow is a metal T-post leftover from Operation Keep the Ducks out of the Road. I used my trusty rubber mallet to pound it into the ground.
The rubber mallet doesn’t distort the top of the post or make an awful ringing sound that digs into your soul for the next 3 hours.
I used old round wooden fence posts for the body, if you are also using recycled lumber do a quick check for any staples or nails that might be hiding. You really don’t want to find one with the saw.
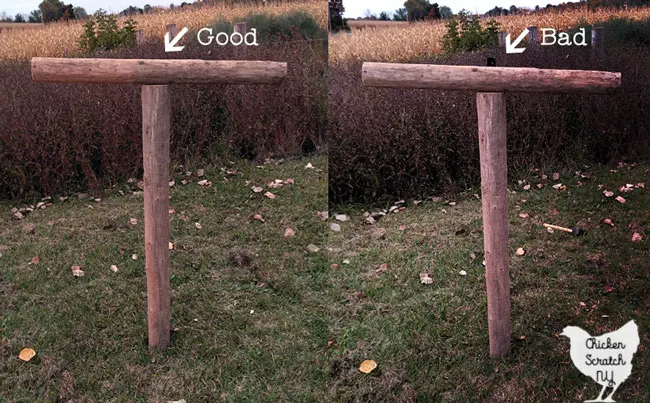
As for cutting the wood to size, there was no real measuring involved. I held the fence post up to the metal T-post and tried to make it so the top of the T-post would line up with the top of the scarecrow frame when the post was pounded into the ground.

I had the whole body put together and screwed to the pole before I realized the T-post was about 1.5 inches too tall and I had to unscrew it so I could pound the post on a bit more and then re-screw it.
The hardest part of this project is attaching the top of the T. Screw the body of the scarecrow to the post in two places before you add the top piece to keep it from moving around.
This is where things get sort complicated. The fence posts are about 4 inches wide so in order to screw two of them together I drilled large holes about 1/2 way into the top center of the arm post.
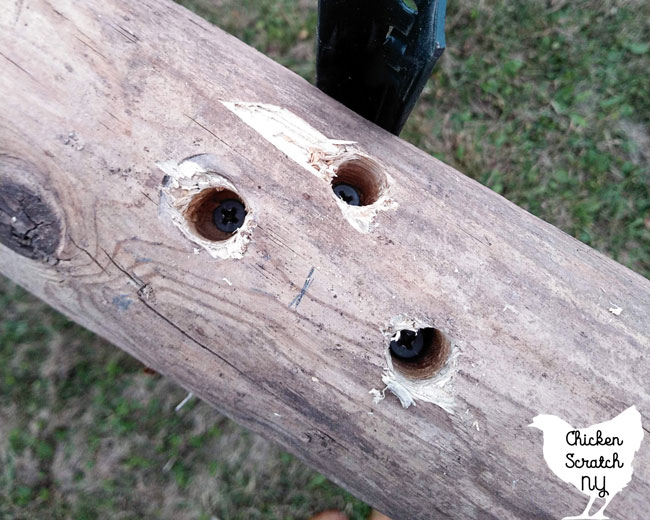
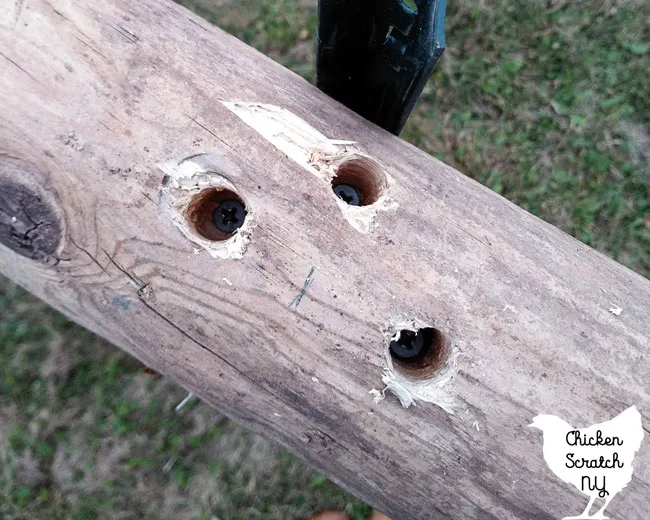
Exactly how big isn’t important, they just need to be big enough to allow the heads of the screws down inside them. I used 3 3-inch screws to attach the two pieces and it’s pretty sturdy.
When the posts are together and you’re sure they aren’t going anywhere give the wood a quick shot of brown spray paint or stain, anything that will make the wood darker.

And now for the fun part! The head.
First things first, grab that big drill bit again and put a few drainage holes in the bottom of the bucket. October is a rainy month and you want that water to have somewhere to go.
Ideally I would have used a few big washers for this next step but instead I had to use some scrap wood. The screws would easily pop through the thin plastic and the washer prevents that.
I hope you enjoy this informational diagram showing where I did a decent job and where I didn’t.
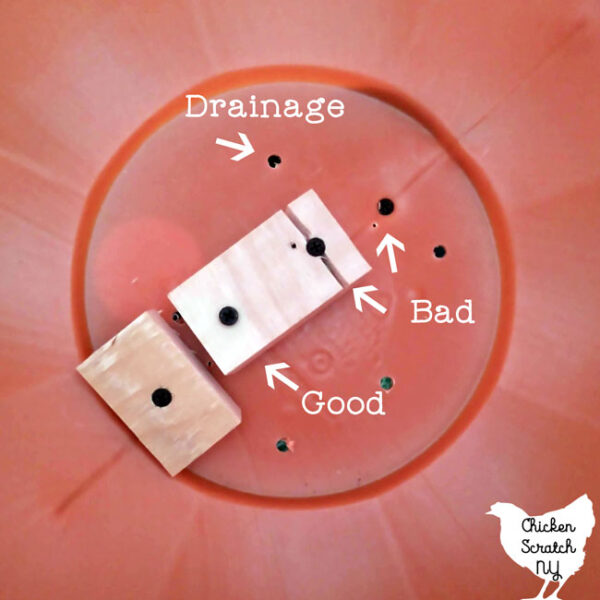

I used 2 1/2 inch screws to attach the head going through a small block of wood first. The scarecrow is just tall enough that I can’t look inside the bucket while I’m drilling and I went too far on the right side and cracked the wood.
That wouldn’t happen with washers and it’s why I recommend you use some if you happen to try this on your own.
We did have a few crazy wind storms come through and my scarecrow still has a head so I’m hoping he’ll be with us for a while.
The final step is adding the scarf. I used a 15 foot piece of the spooky Halloween fabric and draped it over the arms.
It survived the windstorm as well but I’m planning on securing it with a few zip-ties so it stays where I want it.
I hope you’ve enjoyed this terrible tutorial! I’d love to see your versions of this Spooky Scarecrow, you can tag me on Instagram @AleciaCSNY or on Facebook @ChickenScratchNY
Check out my Halloween Page for more ideas or start here: